
Carving peach pits dates far back, especially in Asian cultures. In America it has a sort of folk tradition, if I'm not mistaken.
I find carving peach pits really fun and challenging. I think it would be great practise for those wood carvers or sculptors who normally do bigger projects. I'm not one of those to "discern" some shape inherent in the peach pit, and then bring it out. I'm more of the I-have-an-idea-before-hand-and-I'm-going-to-make-it-work kind of guy. Of course, this goes without saying, you do indeed have to start with a peach pit that is sympathetic to your idea or vision.
You have to consider every cranny and curve and every piece of negative space, and incorporate it all into the final carving. I find the best of way of dealing with the sometimes frustrating negative spaces is simply to enlarge them. Paradoxical: you get rid of them by enlarging them. What negative spaces are left and noticeable I find goes into the charm of the pit carving.
I used this knife to carve these peach pits:

It is the kind of X-acto knife with the screw in blade on top. You go through a number of the blades (they come in little packs of five or so) but I find this knife indispensable. The pointed end is especially important. It is the knife that kissed my finger bones, giving me seven stitches and a four hour wait in emergency. Yes, if you decide to carve peach pits, I cannot emphasize enough: picture yourself cutting yourself and waiting in that emergency room every time you carve. Also picture yourself having to explain to everyone you meet for the following week what you did to your hand.
"What did you do to your hand?"
"I cut it carving peach pits."
"Carving what?"
Have a solid foundation to place the pit on while holding it with your hand; try not to do "free-air" carving.
The following peach pits also went through sanding and staining. I just use sand paper, no electrical tools; just a knife and sand paper. You cheat otherwise. The stain I used for these was a cherry stain. You need at least a week for the stain to fully dry.
This rose which I gave to my mom, is intended as a broach/brooch. We need to find a jeweller who can fix a pin piece on the back of it. I used the two split halves of one peach pit for the leaves. I carved at one end of each leaf a little arm so it could go into the notches made at the side of the rose peach pit. They were fixed in with wood glue. (I'm sorry, I don't know why some of the pictures will enlarge and others will not. Just try them all, and find out.)


I used the pointy end of the blade and turned it as a hand-drill to make holes in either side of the raised center on the back, so that a metal fixture can go in:

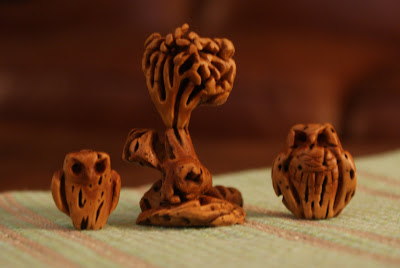
The two owls and tree I gave to my sister. The tree and its base together is made from three peach pits. I carved it so either one of the owls can sit on top. I used a super glue for the tree. The pit halves used for the base of the tree I tried carving to look like old tree roots. I should have spent more time on that part. It's fun carving all the pieces the best you can to get them to match up. As with the rose, notches and 'arms' are carved to fit into each other on all pieces that connect. You never do flat on flat connecting.


16 comments:
Incredible!
Bryan <><
Crikey, you must have a lot of patience. I could never do something like this because i have none. Neither peach pits nor patience.
They are so beautiful and well done. I am inspired to try.
So each rose peddle was individually carved and set into the bud? Could you illustrate this technique a little more? Or refer me to a resource?
I especially love the tree and that each owl can sit in it. I really love it.
Thanks 'CBrown' very much for your comments.
As to your question: The pedals of the rose were not individually carved and set into the bud. It is all one piece - except of course for the two rose leaves.
It seems daunting after first starting on the pit. You will often just want to quit. But you just have to keep carving and shaping.
With the rose that I carved, most of the spaces between the pedals were inherent negative spaces in the original peach pit; and the outstanding pedals the raised surfaces. There's a lot of miniscule scraping involved with the pointed razor knife; lots of scraping on the backsides of the rose pedals so they looked like actual pedals curling back in full bloom.
Again, at some point it will seem like the pit is going nowhere. Just keep carving into it, and suddenly you will start to get something.
Thanks again,
Paul.
Your work is beautiful, but I take exception to the notion that using anything but a knife is cheating. Some people have great skills and arthritis. Powered tools are a blessing, enabling them to continue to create. They aren't cheating.
Fontina,
Thank you for your comment.
Yes, you're right of course about using power tools. I guess that's just my priggishness coming through.
MY HUSBAND WOULD LIKE TO LEARN HOW TO CARVE PEACH PITS CAN YOU DO A VIDEO OR A DVD TO SELL TO TEACH THIS WONDERFUL OLD TRADITION?
I haven't considered doing a video or dvd on this before. But now I'm thinking about it. I imagine a video on peach pit carving would be incredibly boring, since the process is so chip-chip-chip away, and not really delineated by noticeable stages. But I'll think about it. Thanks.
absolutely amazing!
otaqliau 18ermuler 11For those who would likea bit of education for beginners you might wish to try www.PeachStoneCarving.com
It will lead you to a site that details the only complete book dedicated to teaching Peach Stone carving to beginners. It shows 18 finished pieces and details how to carve a number of them. Also how to make a safety carving "Anvil"
This book received rave reviews from the X-ACTO Knife Co.
The owlitos are so cool! And he can be perched on a branch! This is awesome!!
Did you name them?
I never thought of naming them! What is wrong with me? What names strike your fancy?
(I guess what is wrong with me!)
I would name them Ernest and Edward :)
They like their new names. Even though they're not in my care! :)
That is the most Clever thing ever, you made such a simple thing look so incredibly beautiful. You are quite the artiste’.
Thank you!
Post a Comment